October 15, 2014

Simon Says Stamp Wednesday Challenge-Color Coordinates

Today’s Simon Says Stamp Challenge was based on Shari Carroll’s color coordinates look here 

Simon Says Stamp Wednesday Challenge. So I played around with some ideas and came up with this:


I used Simon says Stamp’s new Ugly Sweater stamp and dies set. I colored the two sweaters after die cutting them with my Copic markers and adhered them to me green Bazzill card stock. I used my lawn fawn banners die to cut the green apple Bazzill card stock and taped them to my Simon Says Stamp grey tri-colored pack of card stock which actually when it came did not list the colors that come in the pack of 3 grey colors so it’s like light grey, medium grey and dark grey. 

I think I need to do another card because I’m not feeling this one. …..

And here it is:


Im going to do a detailed description tomorrow but wanted to post it before I forgot.


Love, 
Beth
xoxo

October 13, 2014

Simon Says Stamp Monday Challenge

For the Simon Says Stamp Monday Challenge the theme is O. The letter O. I came up with this card using all the colors of October like orange, brown, green and  I made a leaf card. Fist I stenciled distress inks in ripe permission, tattered rose, barn door, and gathered twigs. Then I spritzed a little water  and voila I had the background. For the Main part of the card, i decided to glitter paper and cut leaves out of my Simon Says Stamp new leaf stamp and die set. I just got the hugest most amazing order of stamps and dies and embossing powders oh my. I have never in my life bought so much in one order but to be honest I was in awe of all the pretty new stamp sets from Simon which to be honest are my fave stamps and dies. I love all the other companies but when they come out with new stamp sets I get giddy. 
I used the word OCTOBER as my theme and stamped "Happy October" with my lawn fawn alphabet stamps and gold princess heat embossed it after I versamarked it. Do you like how I make verbs out of all my products?


I love doing these challenges and I Luv Stamps!

Enjoy and if you are in the mood to try one of these fun challenged they happen Mondays and Wednesdays with different themes. 

Enjoy the Holiday Monday!!!!!!

LOVE,
Beth
XOXO

October 11, 2014

Playing around with Watercolors


These 3 cards are ones I played around with while I had my distress inks out and my kuratake watercolor inks out. I also combined my inktense pencils to get a little mixed media action going. 

Had so much fun making these cards I love watercolors....
Love, Beth

PRODUCTS USED
1. liquid platinum embossing powder by Ranger
2. mini distress inks from ranger
3. kuratake inks

October 8, 2014

Simon Says Stamp Wednesday Challenge…….Watercolors

I always want to do all the amazing challenges online especially on simon says stamp. I don’t know if it’s fear, intimidation or lack of inspiration or excuses but I made myself a promise to join in this week. Today’s theme was watercolors. My favorite. I never really knew how much watercolor was so me. I absolutely love love love playing with paints, distress markers, pencils, sprays, I love all of it. I can literally make 10 cards per day. I love it more than any other kind of medium. I made 4 cards today. I AM GOING TO SHOW YOU EACH ONE.


Todays card was fairly simple. I used versa mark ink to stamp the 3 happy words vertically. These are the Winnie and Walter stamps. I then took my mini drisress inks in squeezed lemonade, salty ocean, peacock feathers, and weathered wood and made horizontal stripes I took a little broken china as well and added them tp the stripes. I then took the Ranger water spritzer and very lightly sprayed but not a lot. I added it to a 110 lb neenah solar white card stock. 

Okay heres the next card

Using the same words made another card the same way with different distress inks.

Heres the last card


Same idea different colors used glitter paper to cut out love you. Thanks so much for coming here i’m so excited to enter my 3 cards. 


LOVE,

Beth
xoxo

October 1, 2014

Online Card Classes Copic Coloring for Card Makers

So…………..Today I am so excited to finally reveal some of my progress from the Online Card Class by Kristina Werner, Jennifer McGuire (my crafting idols) because this has been my 3rd online card class from them and I have really loved them all. My favorite is so far has been Stretch Your Stamps2 but this class was really needed for me because I learned about Copic Coloring. The first 7 days were a lot of techniques and practice pages which I didn’t want to upload to the gallery because honestly they weren’t anything I was really proud of but today the ballerina I did and turned into a card I really am happy with. So without further ado.


It looks my little ballerinas ( my daughters). For those of you who don’t know my daughters are dancers and they are really into it and dance everyday. They both dance competitively and are in companies. So I love coloring ballerinas. I love topic coloring hair and skin. 

Thanks for watching. 

XOXO
Beth

September 22, 2014

Copic Coloring for Card Makers

Today was the first day of the Online Card Class I’m taking and it was really fun playing around with my new Copic Markers. My head was spinning from all the numbers this weekend in preparation and anticipation for this class but watching Jennifer Mcguires’s Video from class really alleviated some of my concerns about natural blending pairs of markers because she said all you really need is a light marker and a dark marker to have a possible good pair. Obviously not every light can be used with every dark she encouraged us all to play around have fun and that was really what I needed to hear so I can stop obsessing about what markers go with what. Thanks Jennifer, you rock!

Here are my practice sheets. I have been getting better and better every time I try and I really love playing especially with long flawy beautiful hair pictures oh my!!! But let’s start with the practice cheers they gave us.


September 16, 2014

Water Color Bat Mitzvah Cards you will feel proud to give.

The last couple of days I have been a card making maniac. I am really enjoying the watercolor class I’m taking from Jennifer Mcguire’s Online Card Classes and since then I have been banging out cards non stop. I can’t wait to take the Copic Marker Class which starts soon. I just ordered a set of Copics from Amazon but to be completely frank I really am having some reservations because lately some of the craft supplies I have bought from them have been less than satisfactory. I have ordered some Hero Arts Inks that were completely dried out and the particular company that seems to have most of what I need has been really poorly handling my feedback. In short I get no response from them. Then I had to order reinkers for the dried out ones and they came cracked in the box. Can you just believe? No bubble wrap on a glass jar. So now I have distress inks with no reinkers and hero arts dried up shadow inks with the wrong colored reinkers. I bought them on Amazon instead of Simon Says Stamp who I love and trust because honestly the Amazon price of just around 300$ you can’t beat. Simon Says Stamp has them for 500$ and change. But here's my dilemma…..I am probably not better off going to SSS because the markers will be juicy and in good condition but I feel for the price. Anyway that’s that and now for the beautiful card I made for various special people in my life. This card is a Bat Mitzvah card. I am Jewish. My daughters go to a lot of Bat Mitzvahs and the cards that are out there are much to be desired.  I needed to take care of that problem and what better way then to have people buy my cars for such a special occasion. So without  further ado here’s my beauty.


It’s hard to see the pretty rhinestones but they are there. I love this card and I’m selling them at various card shops in my area who have a lack of pretty Bat/Bar Mitzvah cards. For your information a girls is a BAT mitzvah and a boys is a BAR mitzvah. 

So now that I have that one done I am heading back to the shop to get try my hand at some of the other techniques Ive learned. Besides using the techniques the classes do something and sparks my creativity so I make tons of great cards from one lesson. It’s so fabulous it’s my second class and I can’t recommend them enough. It’s like they are all so fantastic sounding which one should I choose. 

TECHNIQUE
Tape off a piece of Tim Holtz watercolor paper with a one inch or so border of blue tape to your craft sheet. Wait before that you have to white heat emboss the message centered. Then do the taping I said above. Then I took 3 colors of mini distress inks, picked raspberry, shaded lilac and spun sugar and applied each of them using each ink pad as my tool.I made 3 horizontal stripes but left a little space between each color. Then I took my Ranger mini water spritzer and voila I had magic. I then applied it to Neenah solar white 110 lb card stock and then applied that to bubble gum bazzill card stock with my 1 inch foam tape which is my new love. The bubble gum Bazzill card stock may be my fav. Love how thick and sturdy it is. Thanks my friends!

Materials
Neenah Solar White Cars Stock
Avery Elle Alphabet Stamps (louie)
Distress Inks in picked raspberry, spun sugar and shaded lilac
Blue painters tape
Bazzill Pink Lemonade card stock
Theres Collins tape runner(my fav)
Judikins Embossing Powder in Opaque White


LOVE,
Beth
XOXO


September 5, 2014

Online Card Class…………. Watercolor for Card makers

I started taking the Online Card Class by Jennifer Mcguire and Kristin Werner yesterday. The first two cards were amazing techniques and I want to show you my interpretations here. The first card technique utilized the actual stamp block as a shape and border. You take the block and wipe some distress ink on half of it and spritz it and apply to the center of your watercolor paper. You are trying to achieve a rectangle shape of overlapping watercolor inks. Then you add a diecutted word or phrase to the center in white and voila. I usually don’t do the exact same interpretation of the teachers technique but in both of these instances  I felt compelled to do so since the techniques were right up my alley. Here’s the first one.


I LOVE IT!!!!!!

The second technique from the class had us making a watercolor wash with any watercolor set you may have at home. Then you add a tag or similar added piece of paper with a greeting and tie the card with string. I love the way mine came out!


I love making cards it’s so much fun!!!!!

Love 
Beth 
XOXO

August 25, 2014

Need traveling suggestions

I am leaving tomorrow for a week long trip with my family. It’s not an airplane trip but a driving trip. We are going to Southampton where we rented a beautiful house. I grew up going to the Hamptons with my family and although it may get a bad rap for its fancy shmancy people and stuff, to me it only reminds me of  going out there since I was a little girl. So I want to take some stamps, inks, markers, and stuff but I have not found the perfect multi compartmental  bag and I’ve been unsuccessful in picking the right amount of supplies. I want to take everything. But, I can’t. Have any of you guys dealt with this issue? I have been searching searching searching online for a great bag for a while but I can’t find anything that’s just perfect. 

Heres some of the things I’m considering.

1-Joy Mangano from HSN Bigger better Beauty case- 59$

2-Vera Bradley Travel Accessory- 28$

3. Vera Bradley Hanging Travel Bag-  48$

4. Vera Bradley Tote- 92$

5. Vera Bradley cosmetic cases

6. Vera Bradley Frame Travel Bag- 140$

7. Vera bradley Cargo Travel Bag


1.


3.


4.


5.


7.


5.

August 24, 2014

Watercolor condolence card

I never wanted to buy a stamp set with sympathy messages because it always freaked me out. Last week my mom’s sisters father in law died at the age of 90. He lived a good life but it was his time and I decided to make a card. I used the stampendous wood stamp I bought at Joann's. I love this stamp its very pretty. The link will take you to the same stamp in cling at Amazon but I bought the wood one at Joann's. I silver embossed after versa marking it. I then used my new watercolor paints by Kuretake Gansai. I did a wash of rainbow colors and heat set it. Then I trimmed the Tim Holtz water color paper on green card stock and silver embossed the border so it looks like its actually on a silver embossed card but the back is green. I added a sentiment from the Paper Smooches sentiment stamp set and 
Voila!


Quick and easy yay!!!!!

XOXO

Beth

August 22, 2014

Hero Arts Neon glow girl stamp set


Hi everyone! I made these 3 cards yesterday with my new Hero Arts clear stamp set. It is called Glow Girl. It’s really fun to play with. I started by inking up my first stamp with my new stamp set with 
hero arts neon ink pads and then clear embossing with ranger fluorescent embossing powder. Then I cut a piece of green Bazzill neon green paper and cut it down to leave 1/2 inch border around the white card. Then I adhered both to a top folding 4 1/4 X 5 1/2 Neenah solar white 110 pound card stock. 


Thanks, 

Beth

August 13, 2014

My daughter Julia's card

My daughter Julia wanted to enter the Simon Says Stamp Kids Challenge. She was totally on her own for this one and I am super proud of the results. The only thing I did was cut the paper. She used the paper smooches critters stamp set and first stamped the balloons twice and colored them in with KOI watercolor markers. She then versa marked the sentiment with princess gold  embossing powder by Ranger and heat set it/ She colored in a sun freehand and she taped it on the pink Bazzill card stock with a  Theresa Collins Xyron tape runner.  I love it here it is!!!!!


August 11, 2014

Coloring


Yesterday's bonus class for Stretch Your Stamps 2 was to color. To explore your childlike side and color. Color images. I decided to stamp my Hero Arts flower stamp and watercolor it in with my new watercolor set. I then cut out hello two times, once with white and once with black card stock and staggered them to show dimension and then I took a wood butterfly veneer heat embossed it with purple ranger embossing powder and agreed it too the top. What do you guys think?


Let me know what you all think!!!!!

Thanks,

Beth
XOXO


August 10, 2014

Outline Stamps Day 6


I thought I ordered all the stamps for the class I'm taking but I must have ordered the wrong one for the outline class. I had to improvise :

In this card I a different  flower stamp to create color with different embossing powders by Ranger in Princess Gold, Liquid Platinum and Silver. I thought it came out ok but then I kept futsing with it, Anyway what do you think?


I know I know I shouldn't have added the black heart to the white tag but I was having fun playing with my new markers. 

Let me know what you think…..

XOXO
Beth

August 8, 2014

Outline Stamps

Hi Everyone,


I made a new card from the Stretch your stamps class. This next one was based on Jennifer Mcguire's outline example. I did the same technique but with a different stamp. This stamp is Dyan Reavsely's couture stamp. I love this stamp and I felt it worked perfect for the technique. I versamarked the stamp and took different embossing powders and outlines the stamp. FUN!

What do ya think?


Anyway I am on way to a One Direction concert with my daughters. I always feel like a gazillion years older than I am when I go to concerts also because my kids say" Stop dancing" "stop singing" "don't make that face",ETC!!!!! I don't know how I ever manage to function without them.

Thanks, 

Beth

XOXO


August 7, 2014

Milo's Alphabet Stamps by Lawn Fawn


OK so let me start by saying yes I agree with everyone that the alphabet stamps called Milo's from Lawn Fawn are so stinking cute but I had a difficult rough time with the, Seeing them was virtually impossible and then when my Versamark was on them I had to out them in a strainer to get them clean because one ended up on my toe one was stuck to my hair and I was so frustrated. I did a random letter arrangement on white card stock and gold embossed it with Ranger Princess gold embossing powder before I masked off a heart shape so I could attach the gold paper to the center heart and white emboss I LOVE YOU to the heart. I cut the card down and attached it to 
Neenah solar white 110 lb card stock and then attached a pink glitter hear and cut two strips of the pink glitter paper to add some umph to the sides. What do ya think?


Besides all the issues keeping the letters out of my hair and on the block I had a hard time keeping my background straight. I'm trying again now with a different layout and seeing if I can do it.  Otherwise I'm going to buy a bigger font. Hey Life shouldn't be that difficult. It should be fun right? No but seriously it was fun just hard. What do you guys think?

Thanks,
XOXO


Beth

Hi Guys,
I tried this technique with bigger stamps. take a look, I'm on my way to take my daughters to a One Direction concert and am rushing. Details to follow:


XOXO BETH


August 6, 2014

You Are Awesome Card

So today I'm feeling completely incapable of creating. Very busy day so the card I decided to use to inspire my creativity was the "Go Be Wonderful" I think that's what it is. I'm still waiting for my Milo stamps which I am using as the excuse for my card not being fantastic. HA HA

.  


Here it is:


Pretty simple


Just stamped sentiment with Versamark and white 


embossed it. Cut a strip of white paper and attached it to the side and added doodlebug sprinkles. VOILA!!!!!


Thanks for stopping by,

XOXO
BETH

August 5, 2014

Ombre Background Stamp with Watercolors


Hello it’s Beth and I’m a bit behind in my posts but hey I had to make dinner, give my daughter Julia a little attention and feed the dog but I am back and ready to go. If you are wondering I made the yummiest meatloaf which originated with my grandmother but I tweaked the recipe because she has a heavy hand when it comes to the garlic. Whee did that come from??That’s my brain. It goes from cards to oh where’s Julia and where’s Isabella (oh yes she is at camp for 7 weeks) but its so crazy the way my brain wanders. I guess that’s why I have unfinished cards all over my house. OK so here’s the card……. 


Here’s one of the cards I made from Day 2.
It was a technique using ombre distress ink. I kinda had a hard time doing it. The instructor obviously made it look effortless but you should see what my workspace and my supplies and everything look like before, during and after my card making. TORNADO!!!!!

Here is it:


And a side view


DIRECTIONS:

OK so I took Tim Holtz distress watercolor paper and started with a peacock feathers distress marker and then took a salty ocean marker and sprayed some water between them  and then wiped a little off and took a squeezed lemonade marker and applied the color to the end third of the card and misted again with Ranger mister. Again I gave it a quick wipe. Used a Tim Holz sentiment in keeping with the whole Tim Hotz parade and platinum embossed the sentiment on to  Neenah white card stock and since I didn’t have yellow paper to back this onto to give it contrast I decided to take squeezed lemonade distress stain and then versamarked it and then clear embossed it to make the yellow paper.That was problem solving don’t ya think?

I LOVE MAKING CARDS!!!!!FUN FUN FUN

THANKS FOR STOPPING BY

XOXO
BETH

Stretch your stamps 2 Day One

I had so much fun today tying out the new techniques I learned on the online card class I took. I especially loved the techniques I learned from Kristina Werner and Shari Carroll. I really feel my card making creativity elevate. I was going through a slump in creativity and this class has really helped. Here are my 2 creations. The first one I made is based on the tutorial from Shari Carroll who I love. I watch her color coordinates videos and wait for her Friday posts. She's awesome.


I first took my distress inks in picked raspberry, mowed lawn and peacock feathers and created a square of colors on my craft sheet. Then I spritzed it with my water spritzer the I put my stamp face down in the ink and then put it face down on my water color paper. I made several before I was happy with the result. WHAT DO YA THINK???????

Here's another angle


Isn't it pretty????

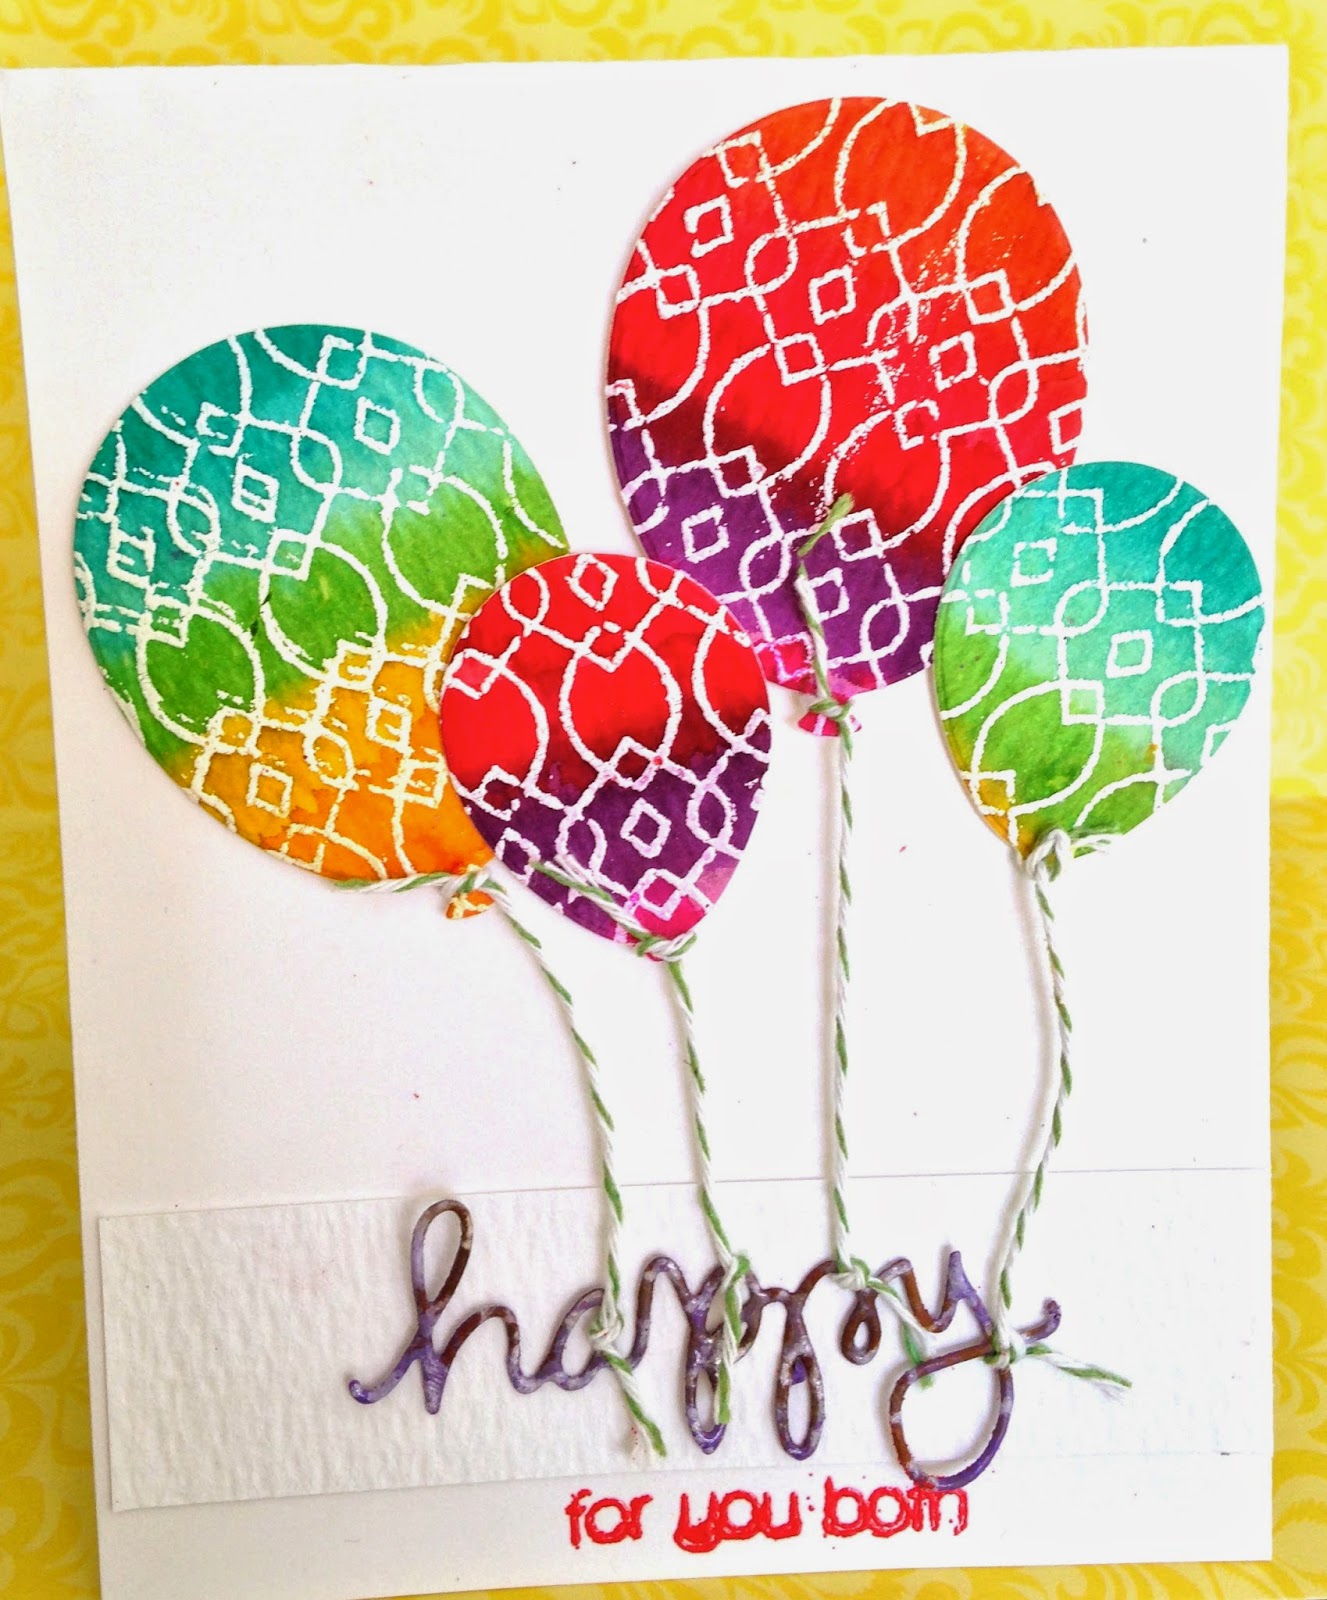
The second card is from the Kristina Werner tutorial. I love her and think she's so talented. Anyway we had to take a background stamp and emboss and headset it with white embossing powder. Then we did all these fun watercoloring techniques and were encouraged house the background as pieces of other cards so without further ado….


I die cut the "balloons" and tied the strings onto a happy Simon Says Stamp die cut and then embossed
"for you both" from the "happy stamp set" and applied ranger red embossing powder and heat set it.

Here's another angle…


I watercolored the background before I cut out the balloons several times to get that effect.


I had the best time making these two cards. Will keep you guys posted. 

XOXO
Beth


August 3, 2014

Hero Arts One Layer Stamp Challenge


I am entering a Hero Arts one layer stamp challenge just for the fun of it. I have never entered a stamp challenge before but it was a lot of fun. It was really challenging to keep it one layer. You are allowed to use embellishments. I used a Hero Arts background "friends" stamp with my Versamark ink and used different colored embossing powders from Ranger to color the background. In keeping with the same color scheme I used the embossing powders to color paper and I then die cut Simon says Stamps balloon dies to add something to the card. I then tied string to each balloon and used a technique Tuesday sentiment. Here it is:


Supplies used: 1.Black Bazzill card stock 2.Friends background Hero Arts stamp 3.Purple,pink and red embossing powder from Ranger 4.Technique Tuesday sentiment stamp 


Thanks for visiting 


xoxo

Beth

stretch your stamps 2 class

I'm so excited to be starting my first ever online card class with two of my favorite people in the card making world. Jennifer Mcguire and Kristin Werner. I purchased some of the recommended supplies and will use my own for the ones I couldn't get. I will post tomorrow with my experiences. YAY!!!! Go to Onlinecardclasses to see some of the cool classes you can take. In the mean time here's a card I'm adding to the online card gallery for students of this class.
This card was from The Simon Says Stamp July card kit. I loved this kit. Go to Simon says Stamp/Julymonthycardkit to see the kit.

Simon Says Stamp Wednesday Challenge-Color Coordinates

Today’s Simon Says Stamp Challenge was based on Shari Carroll’s color coordinates look here  Simon Says Stamp Wednesday Challenge . So I p...